

When preparing for my daughter's first birthday party, I really wanted a sunshine wall hanging to put up behind her high chair. The theme for her party was "First Trip Around the Sun", so I used lots of yellows, oranges, pinks, and purples as well as sunshines as decoration inspiration. I couldn't quite find the right wall hanging, so I decided to make one!
I am still amazed by the fact that you can just place fabric on top of a bigger piece of fabric to make a quilt aka raw edge applique! So crazy! It seems like it would be so much easier than traditional piecing, foundation paper piecing, English paper piecing, or any of the other ways quilts/quilt designs are often pieced together. It ended up being easy in some ways and challenging in other ways, and I am excited to tell you all my process and explain some of the struggles I had.
Supplies:
- large piece of fabric for the background (mine was about 1 yard)
- small pieces of fabric for the sun and rays (or whatever design you are going to create!)
- large piece of cardboard (or you could use poster paper), same size as the quilt
- scissors or box cutters for cutting cardboard
- permanent marker for drawing on cardboard
- scissors or rotary cutter for cutting fabric
- Pellon Wonder Under Fusible Web Regular Weight
- iron
- fabric marker (washable)
- backing, basting spray, batting, binding
Steps:
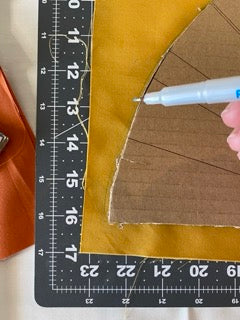
1. Draw your design on the cardboard/poster paper using permanent marker. I made a "half sunshine" so I started with a half circle and then drew the rays. (As you can see, I had to draw and re-draw a few times to get it right! I used rulers to keep the lines straight.)

2. Cut out pieces of design. These will serve as templates. (I wrote the number order on my ray pieces so that I remembered where each one was supposed to go!)

3. Trace the templates onto pieces of fabric. Cut the shapes out, but to do not cut on the line. Cut 1/2 inch to 1 inch around the shape.
4. Iron the shapes onto the Pellon Wonder Under Fusible Web.

5. Cut the shapes out on the lines.

6. Set out cut out pieces on the large piece of background fabric. Make sure they are exactly where you would like them to be. Take off the paper from the Wonder Under and iron them on. This can be really tricky with large pieces!


7. I used a golden yellow thread around the edge of every piece to help keep it in place. I tried to stay as close to the edge of the shape as I could, usually about 1/8th in seam allowance. (I didn't get a photo of this step!)

8. Now it's time to finish the quilt! Baste, quilt, and bind!


I used this as a backdrop for my daughter's first birthday, and I'm planning on hanging it in her bedroom soon!